GardenForums.com a friendly and growing community of gardeners.
We feature a
Garden Discussion Forum and
Garden Photo Gallery. It's a fun and friendly place to talk with other gardeners, ask questions, share you knowledge, view and post photos and more! Whether you're a master gardener, or brand new to the hobby, you'll find something of interest here.
We are in rain barrel production mode at our house.
I made my own by cutting a hole out of the top of a trash can and sitting it under the down spout. I put an old screen under the lid to keep the bugs and leaves out of it.
They are super easy to make. We are doing a large line of them against the back of our garage they are going to overflow into each other then we are running soaker hoses from them for our large tomato patch next year. We are also planning on putting them up at our new property if we get it. It will be 4.22 acres so we will have plenty of planting room and will need to conserve lots of water.
Great ideas!
I am in Zone 5..could the plastic be left out in winter months and survive?
Ours did great last year and the year before. They were open type barrels so we acutaly had to band them back on, It was great having water in the spring this year when we had that small drought....lol.
Cute video. I've got a better idea and more convenient PDF file. Normally I sell this design, however can make exceptions here. Free to download for this forum.
Make a rain barrel NOW !
Consumer Reports latest issue talks about a possible water shortage coming as soon as 2013 ! This is an intense problem for our pocketbooks and plants. What can we do to remedy this ? Simple. Make a rain barrel downspout manual irrigation system. Here we'll talk about how to make a semi-fancy rain barrel from a few easy to obtain supplies.
Supply list:
1) 55 gallon (food grade) plastic barrel. White or blue will do fine. $30.00 shipped (Ebay) The rest can be bought at Menards or hardware store.
2) 2pcs - black pipe 90 degree elbows. Female threads both ends
3) 1pc - 4" long black pipe with both ends threaded.
4) 2pcs - 3" long black pipe with both ends threaded.
5) 1pc - 3/4" thread ball valve (double female threaded ends)
6) 2x4 wood laying around & small plywood platform
7) 1 - aluminum 60 degree downspout elbow
8) 1 - Flex 3' downspout attachment that fits the 60 degree elbow
9) Sheetmetal cutters & some caulk
10) Long straps to support barrel to a post. Find some plastic twine or straps
Great ! Now we have all our supplies and we just spent about 50 bucks. Let's get started !
Pre assembly: When we finally get our barrel, rinse it out with plenty of water and drain.
Cut & drill holes:
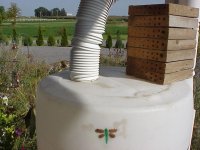
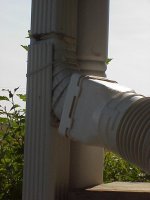
Unscrew the plastic lid and you'll see a 3/4" pipe thread inside the biggest thread. Take a 3/8" - 1/2" drill bit and drill a hole into the center of the 3/4" threaded hole. Replace the lid to its original position and tighten down securely. Flip barrel over to bottom end. This is where the Flex downspout hose will come into play. Place the non-downspout end on top of the (Bottom side of) barrel and draw a circle around it on the barrel. Drill a pilot hole through this (Approx. 3-4" hole) and use a jig saw to cut out the larger hole unless you have the correct size hole saw. Deburr. (Picture 1)
Grab the aluminum downspout 60 degree elbow. On the elbow portion, draw a small rectangle shape right in the middle and cut out. See (picture 2). When done we'll have to sever part of the original downspout and do a cutout in order to insert the 60 degree elbow. Measure and do the cutout now in the bottom downspout section. The slot in the elbow is for 50/50 drainage. 50 percent into the rain barrel and the rest goes through the downspout. This part is necessary due to overflow.
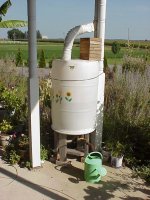
Now would be a good time to make a small table out of 2x4's & plywood to hold a possible 500 lbs. for weight ! Set the stand right underneath where you wish to put your new rain barrel.
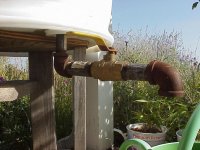
Put together the spigot: With the first 3" long black double threaded pipe, screw into barrel lid cap center. Use channel lock pliers to tighten. Add one 90 degree pipe elbow and connect with first 3" pipe. Tighten elbow with two channel lock pliers, one on pipe, other on elbow. Next piece is the 4" long black pipe connected to the 90 degree elbow. Tighten with channel locks. Affix the ball valve to 4" pipe and tighten until it's right side up. The 3" long pipe is next and finally the 90 degree elbow facing downward. See (picture 3) I'll put a small watering can underneath the spigot for convenience.
Place the barrel, spigot side down on stand. Center the weight as best as possible.
Connect the flex fitting to the elbow and finally into the top of the barrel.
Strap the barrel to a post or something for bracing purposes.
Caulk up the aluminum downspouts & holes. (NOT on the top end of barrel where you made the flex fit connection). This is left uncaulked for an overflow.
That's it ! Wait for it to rain ! or if you wish to cheat, fill it up with the garden hose a bit until it rains. ENJOY ! (Picture 4)
-
Rainbarrel1.jpg
102.8 KB
· Views: 480
-
Rainbarrel2.jpg
74.6 KB
· Views: 486
-
Rainbarrel3.jpg
117.4 KB
· Views: 487
-
Rainbarrel4.jpg
123.4 KB
· Views: 509
An idea for simplify and make the spout more useful in GPM's design.
this list would replace parts numbered 2-5 in the list.
One black 90 3/4"
one 3" long 3/4" nipple
one 8" long 3/4" nipple
one hose bibb with 3/4" female threads
Attach the 3" nipple and the 90 the way he describes. attach 8" nipple to the 90 and the bibb to the other end of the pipe. now you have a hose bibb for your soaker hose. I recommend using Teflon tape on the threads, helps reduce leakage.
I just use empty spackle pails, kitty litter pails and put the lids on when they are full to keep out bugs, easy to carry around the yard that way.
Great idea...i may do this.
Gardenforums.com is a participant in the Amazon Services LLC Associates Program, an affiliate advertising program designed to provide a means for sites to earn advertising fees by advertising and linking to amazon.com